Sport Climb Tracker is a Garmin watch app for tracking sport climbing sessions. It automatically records heart rate and altitude during your climbs, and lets you log route details such as grade, result, mode, and style immediately after each route.
Download on Garmin Connect IQ →
Installation
- Open the Connect IQ app on your phone, or visit apps.garmin.com.
- Search for Sport Climb Tracker and tap Install.
- Make sure your watch is connected to your phone via Bluetooth so the app is transferred.
- On the watch, find the app under Activities.
Getting started
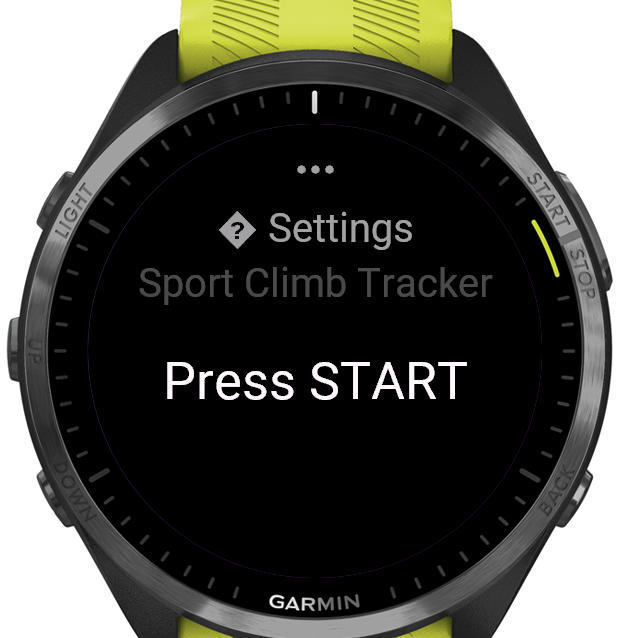
- Open Sport Climb Tracker on your watch from the Activities menu.
- The app starts a session immediately and begins recording heart rate and altitude.
- Configure your location and grading system in Settings before your first session (hold MENU).
- Start climbing. Either press LAP / BACK to manually start a route, or enable Auto-detect to let the app start a route automatically.
- When you finish a route, press LAP / BACK again. A logging screen appears to record the details.
- At the end of your session, press START and choose Save. Sync your watch with Garmin Connect to see your data in SportClimb Analytics.
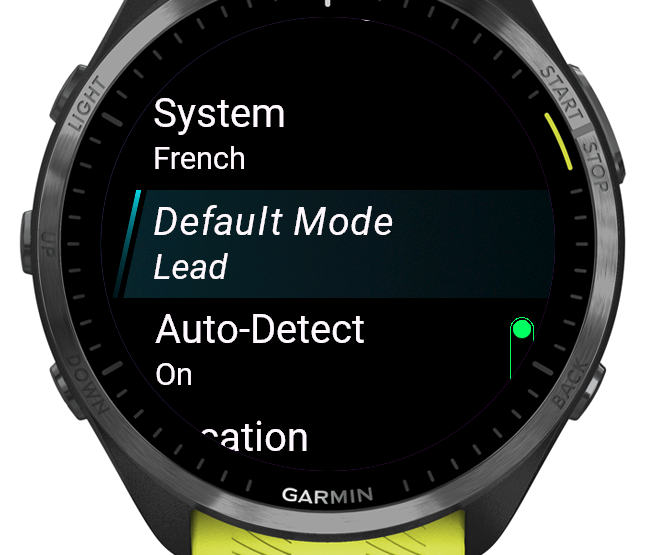
Settings
Hold MENU on the main screen to open settings. On touchscreen-only watches (e.g. Vivoactive 6), swipe up on the start screen to open settings. The app remembers all settings between sessions.
| Setting | Description |
|---|---|
| Location | Sets the climbing location type, stored in the FIT file for analytics. Gym — indoor climbing wall Board — training board (Moonboard, Kilter etc.) Crag — outdoor rock Boulder — outdoor bouldering |
| Grading system | The grading scale shown in the route logger. French (default) — 5a, 5b, … 9b+ UIAA — IV, V, … XII USA — 5.6, 5.7, … 5.15d |
| Default mode | Pre-selects the climbing mode (Lead, Toprope, or Warmup) when logging a route, so you don't have to change it every time. |
| Auto-detect | When On, a route starts automatically after detecting more than 1.5 m of upward movement. A beep confirms. Useful when you want hands-free operation. When Off, you start every route manually with LAP / BACK. |
| Touchscreen | Enable or disable the touchscreen during a session. Disable it to prevent accidental taps while climbing. |
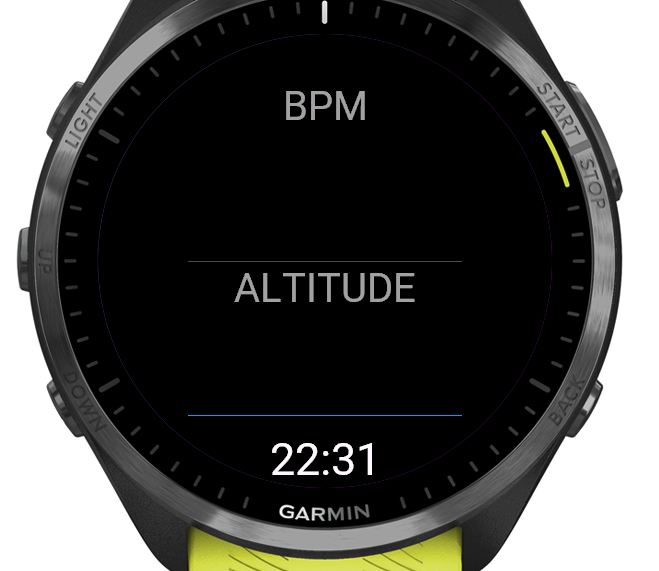
Main screen
The main screen is your home base during a session. It shows:
- Heart rate (top) — color-coded: green below 120 bpm, orange 120–150, red above 150.
- Altitude gain (center) — relative height gained since starting the session. When a route is active, this shows the current route height in red.
- Barometric altitude (below center) — the absolute altitude from the watch barometer.
- Route count (bottom) — total number of completed routes this session.

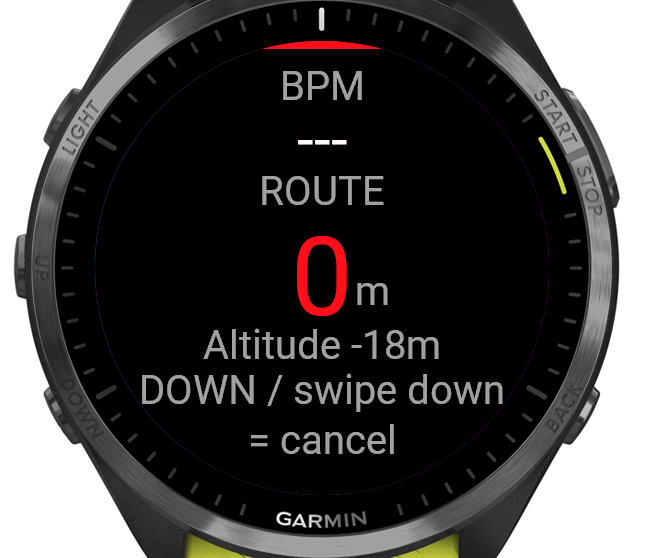
When a route is active, a red strip appears at the top of the screen as an indicator.
Button overview
| Button | Action |
|---|---|
| LAP / BACK | Start a route (when idle) or finish a route (when climbing) |
| START | Open the save/discard session menu |
| DOWN | While climbing: cancel the current route without saving it. Otherwise: open session overview |
| UP | Open session overview |
| MENU (hold) | Open settings |
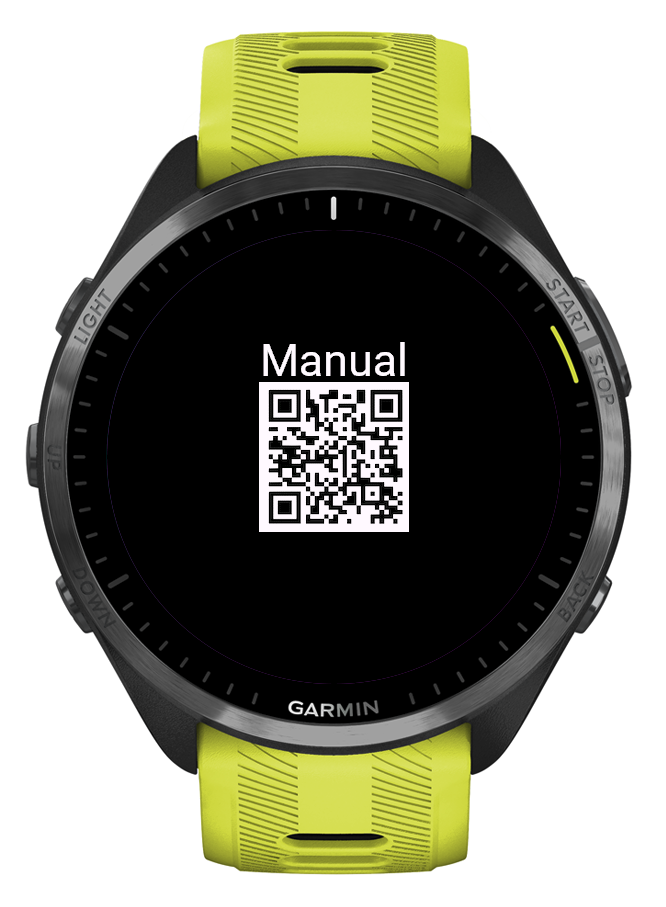
Touchscreen navigation
On touchscreen devices, swipe down or up to navigate between screens (main → session overview → graph → manual → analytics QR code). When a route is active, swipe down to cancel it — a confirmation screen appears. These gestures work alongside physical buttons on devices that have both.
Auto-detect
When auto-detect is enabled in settings, the app monitors the barometric altitude every second. If it detects more than 1.5 m of upward movement within a 5-second window, a route starts automatically. A short beep confirms the detection. You can still start and stop routes manually at any time.
Session overview
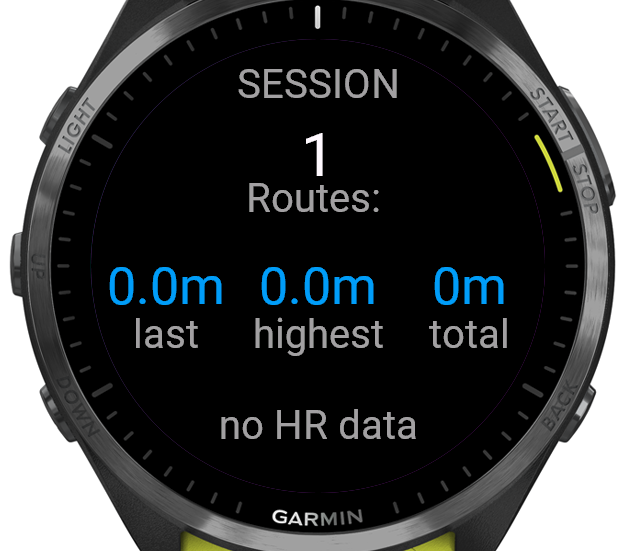
Swipe to the session overview (press UP or DOWN from the main screen) to see a summary of your current session:
- Routes — number of completed routes.
- Last — height of the most recently completed route.
- Highest — highest single route this session.
- Total — total height gained across all routes.
- BPM min–max — heart rate range recorded during the session.
| Button | Action |
|---|---|
| DOWN | Open graph |
| UP / BACK | Back to main screen |
Graph
The graph screen shows two charts recorded over the course of the session:
- BPM (top chart, red) — heart rate over time.
- Altitude (bottom chart, blue) — barometric altitude over time.
| Button | Action |
|---|---|
| DOWN | Open manual QR code |
| UP / BACK | Back to session overview |
Logging a route
After finishing a route (pressing LAP / BACK while climbing), a logging screen appears. Scroll through the fields and tap to change each value:
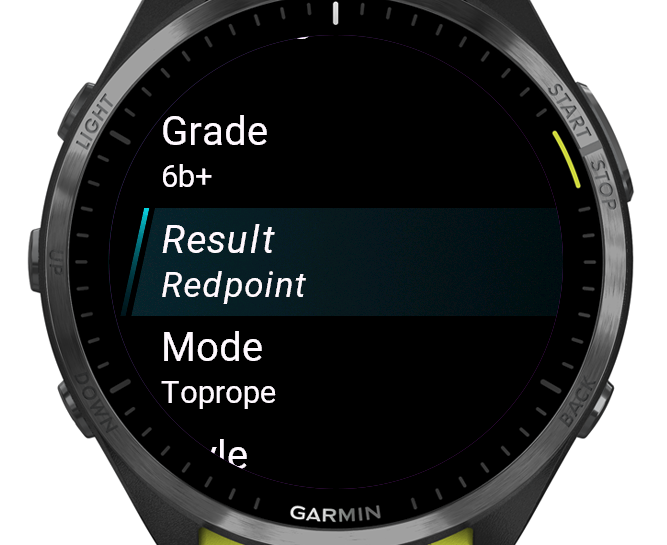
| Field | Options |
|---|---|
| Grade | Select from French, UIAA, or USA grades (grading system set in settings). Tap to open the grade picker. |
| Result | Tap to cycle through: On Sight, Flash, Redpoint, Hang Dog, Sandbagged, DNF |
| Mode | Tap to cycle through: Lead, Toprope, Warmup |
| Style | Tap to cycle through: Slab, Vertical, Overhang, Roof |
| Height | Pre-filled from the measured altitude. Tap to open the picker (1–60 m). |
Press SAVE to confirm and store the route in the FIT file. Press BACK to go to a confirmation screen where you can also choose Don't save to discard the route entirely.
The last-used values for grade, result, mode, and style are remembered for your next route.
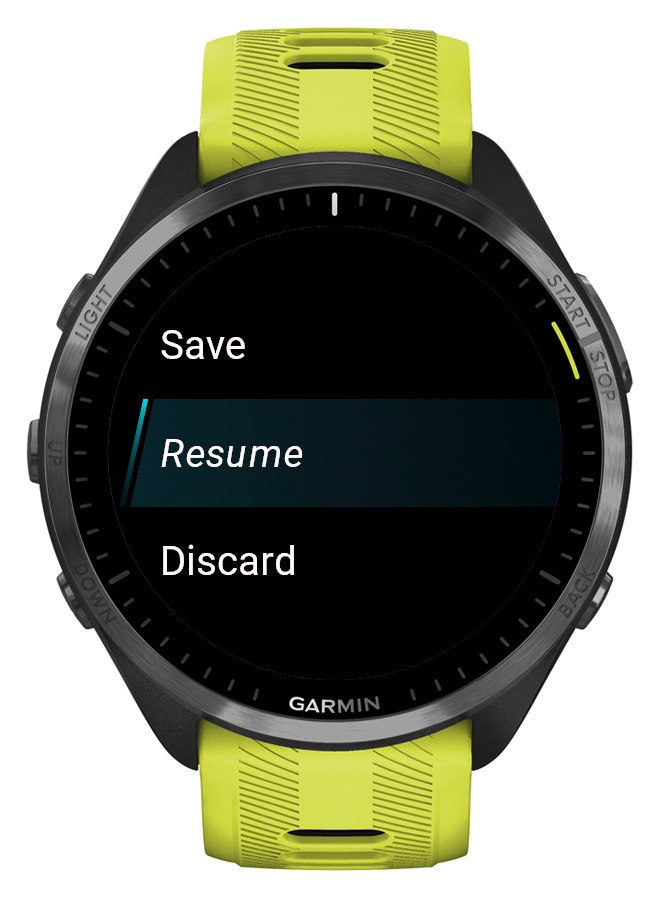
Saving a session
- Press START on the main screen to open the session menu.
- Choose Save to save the session as a Garmin activity, Resume to go back, or Discard to delete the session.
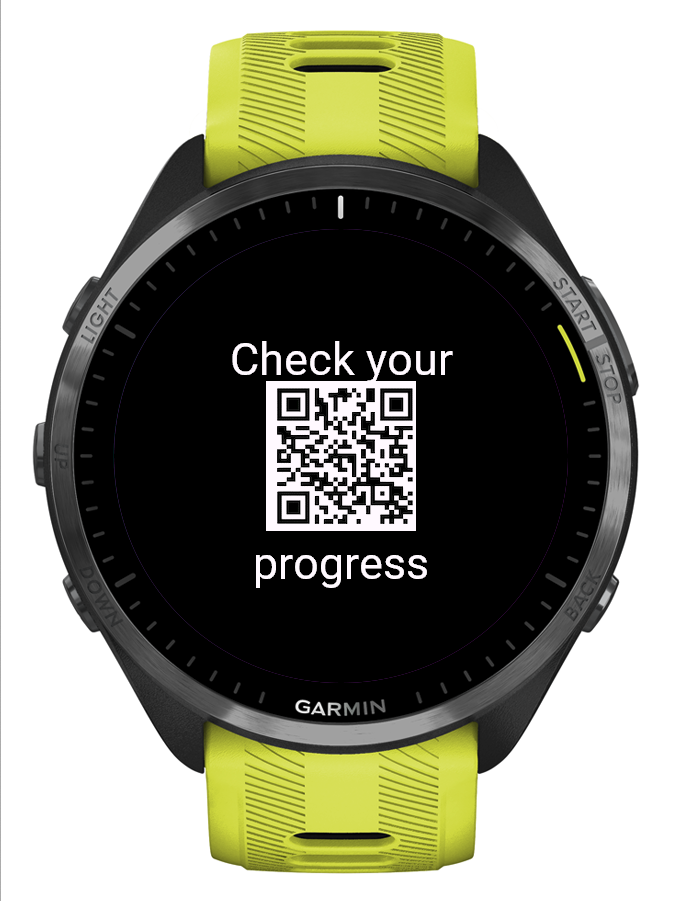
- After saving, a QR code appears. Scan it to go directly to SportClimb Analytics.
- Sync your watch with Garmin Connect (automatically or via the app). Your session data will then appear in SportClimb Analytics.
Stats
The stats screen shows a summary of your climbing history stored on the watch. No session needs to be active to view it.
Open it from the start screen by pressing DOWN or swiping down.
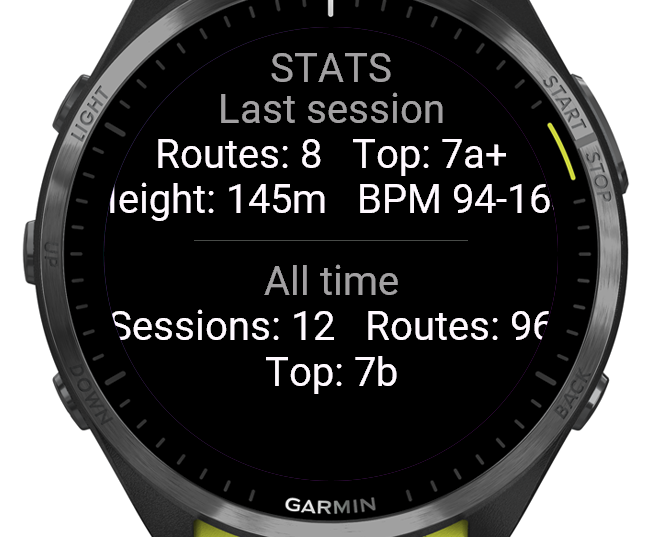
- Last session — routes climbed, top grade, total height gained, heart rate range.
- All time — total sessions, total routes, highest grade ever.
Stats are saved automatically each time you save a session. The first time you open this screen it will show "No sessions yet".
| Button | Action |
|---|---|
| UP / BACK / swipe up | Back to start screen |
SportClimb Analytics
All route details and session data recorded by the watch app are stored in the Garmin FIT file. After syncing your watch with Garmin Connect, the data is automatically picked up by SportClimb Analytics — no manual export needed.
In SportClimb Analytics you can view:
- Session summaries and route history
- Progress over time (grade, height, heart rate)
- Charts and statistics per location and climbing style